自定義 HTML 塊允許您將自定義 HTML 新增到您的內容中。該塊也將接受 JavaScript 程式碼,但不會接受伺服器端語言,例如 PHP 程式碼。您可以使用塊工具欄上的選項在檢視 html 源或預覽 HTML 之間切換。與純粹用於在頁面/文章中顯示程式碼的程式碼塊不同,自定義 HTML 塊實際上會在瀏覽器中呈現您新增到塊中的 HTML 。
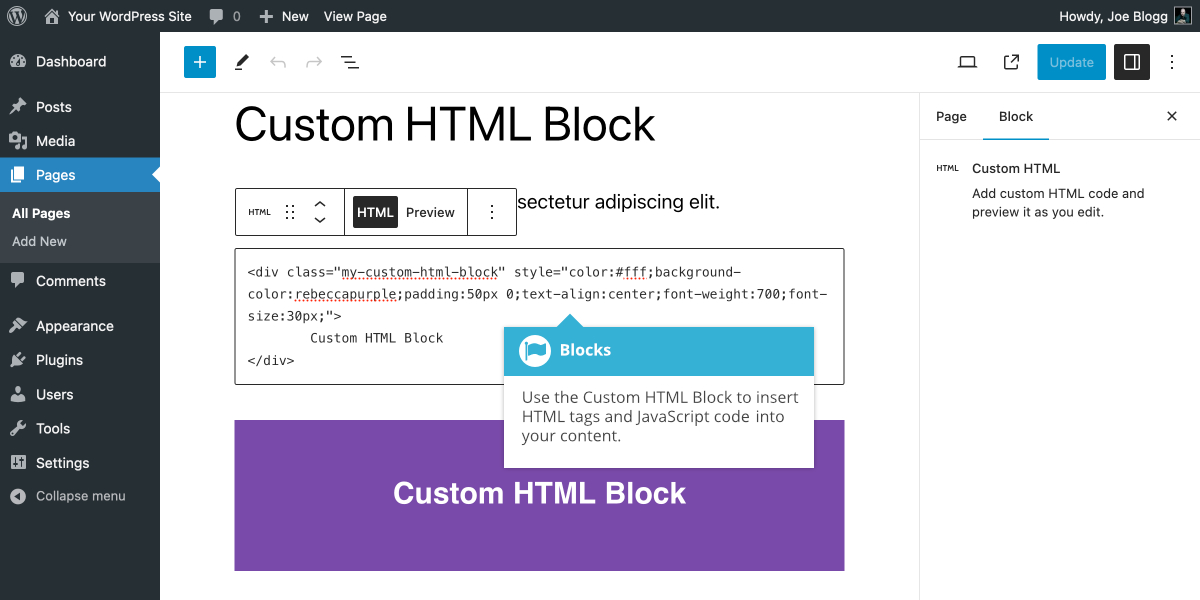
自定義 HTML 塊允許您將自定義 HTML 新增到您的內容中。該塊也將接受 JavaScript 程式碼,但不會接受伺服器端語言,例如 PHP 程式碼。您可以使用塊工具欄上的選項在檢視 html 源或預覽 HTML 之間切換。與純粹用於在頁面/文章中顯示程式碼的程式碼塊不同,自定義 HTML 塊實際上會在瀏覽器中呈現您新增到塊中的 HTML 。
要將新檔案新增到媒體庫,請單擊左側導航選單中的「新增新檔案」 連結或頁面頂部的「新增新檔案」 按鈕。
如果您在列表檢視中檢視媒體庫時單擊新增新按鈕,或者單擊選單中的新增新連結,只需將影象從計算機上的任何位置拖到標記為將檔案拖放到此處的區域即可。您的檔案將自動上傳。
上傳影象或檔案後,它們會列在檔案上傳器下方。如果您想編輯檔案屬性,請單擊檔案旁邊的編輯連結。如果您只想複製上傳檔案的 URL,請單擊 「將 URL 複製到剪貼簿」按鈕。

如果您在網格檢視中檢視媒體庫時單擊新增新按鈕,則可以將影象從計算機上的任意位置拖動到螢幕上的任意位置。您的檔案將自動上傳。
上傳影象或檔案後,它們會與其餘媒體一起顯示在檔案上傳器下方。
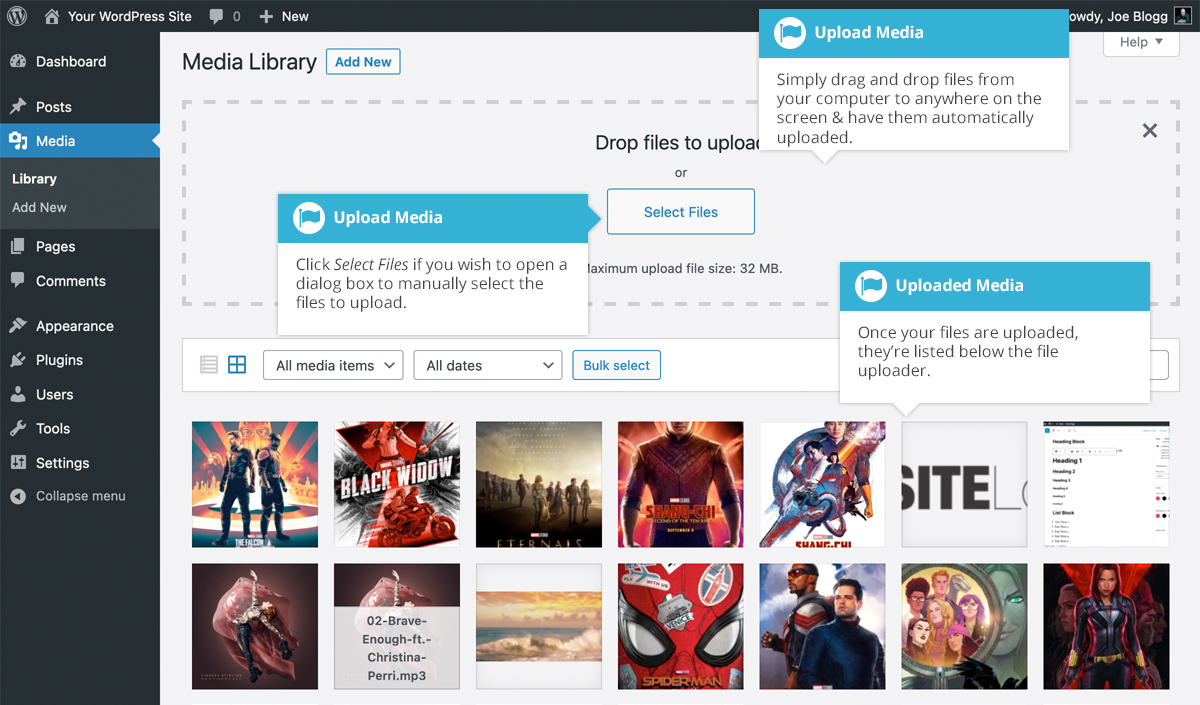
上傳檔案時,您還可以單擊 「選擇檔案」按鈕,然後使用顯示的對話方塊視窗選擇要上傳的檔案。
Inserting an audio or video playlist is almost identical to inserting an image gallery. Click the Add Media button (![]() ). A pop-up window will display that looks the same as the one that displays when you add an image to your Page/Post. You can upload new media files to use in your playlist or you can simply choose from your previously uploaded files.
). A pop-up window will display that looks the same as the one that displays when you add an image to your Page/Post. You can upload new media files to use in your playlist or you can simply choose from your previously uploaded files.
By default, you』ll be shown a list of your previously uploaded files. If you』d like to upload a new media file, click on the Upload Files link at the top of the pop-up window or simply drag 』n drop your new images into the pop-up window.
To create an audio playlist, click the Create audio playlist link in the left-hand navigation. The pop-up window will display a list of your audio files.
Alternatively, to create a video playlist, click the Create video playlist link in the left-hand navigation. The pop-up window will display a list of your video files.

After selecting your media files, click the Create a new playlist button at the bottom of the pop-up window. The window will change so that only the selected media files are shown.

All the media files that appear will be used within your playlist. To reorder the files simply click on a file and drag it to its new position. You can change the title for each file by clicking the text below each file and then typing in your new title. Alternatively, click each file and then update the Title, Caption and Description on the right-hand side of the pop-up window.
If you decide you no longer want a certain media file to appear in your playlist, click the small 『-』 that appears in the top right corner of the file when you hover your cursor over the 『x』.
You can change how your playlist appears in your page by selecting which items you』d like to appear.
When inserting an audio playlist you have the following display settings.
When inserting a video playlist you have the following display settings.
此螢幕列出了您站點的所有現有使用者。具有管理員以外角色的使用者在登入時將看到較少的選項。根據您的角色,您還可以新增新使用者以及管理他們的角色。
螢幕頂部有一些連結,可讓您根據使用者角色過濾使用者列表。括號中的數字將表明該特定型別有多少個。

將滑鼠懸停在使用者列表中的每一行上時,連結將出現在使用者名稱下方。
使用者可以具有站點管理員設定的五個定義角色之一:站點管理員、編輯者、作者、貢獻者或訂閱者。
首次安裝 WordPress 時,會自動建立一個具有所有功能的管理員帳戶。
使用者列表中顯示的頭像使用所謂的 Gravatar 。Gravatar 是全球公認的頭像。Gravatars 目前被大量部落格、論壇、聊天網站等使用。Gravatars 允許您擁有一個隨處可見的頭像,而不必在您註冊的每個系統上上傳頭像。要建立 Gravatar,只需訪問gravatar.com並註冊即可。要在 WordPress 中使用 Gravatar,只需將郵箱地址新增到您在 Gravatar 站點中配置的個人資料中,該地址就會自動顯示。
也可以看看:
透過 「可用工具」選單選項,您可以訪問「類別和標籤轉換器」。類別和標籤轉換器是一個用於將類別轉換為標籤的工具,反之亦然。在使用之前,必須透過「匯入」選單選項安裝它。
您可以透過修改與您個人資料關聯的首選項來停止顯示工具欄。
只需單擊左側導航欄中的「使用者」 連結即可顯示使用者列表。在此使用者列表中,單擊您的使用者名稱,或將滑鼠懸停在每行上時單擊使用者名稱下方顯示的編輯連結。
或者,單擊左側導航欄中「使用者」選單選項下方或彈出選單中的 「您的個人資料」連結。
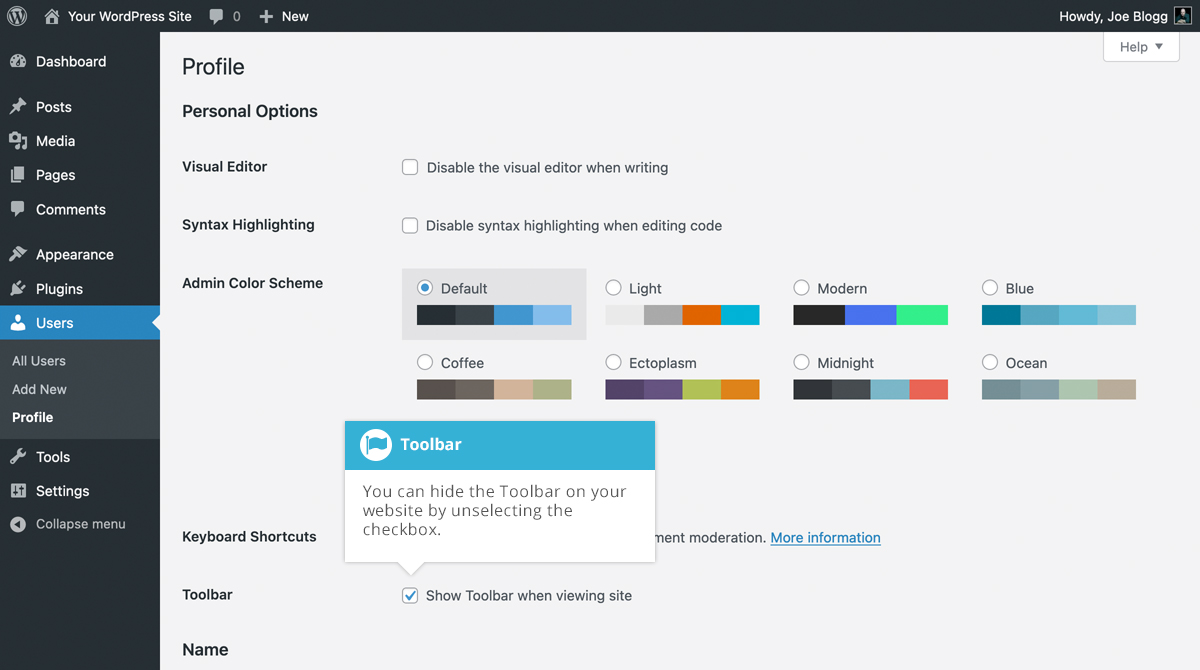
編輯您的個人資料時,有一個工具欄選項,如上面的螢幕所示。
Synced patterns, which were previously called Reusable Blocks, are Blocks that you can re-use anywhere on your site. A Synced pattern can be added to any Page or Post, and as many times as you want. If you update or change the style of your Synced pattern, the changes are automatically applied to that block, right across your whole site.
To create a Synced pattern, simply add a block, add your content to the block then style it how you'd like it to appear. Once you've got the block looking how you want it, click the Create pattern/reusable block option under the Options icon on the Block Toolbar. You're then prompted to enter a name for your Synced pattern. After doing so, click the Create button to save it. Your new Synced pattern/ Reusable Block will appear under the Synced patterns tab (![]() ) within the Block Inserter.
) within the Block Inserter.

If you』d like to remove or edit any of your Synced patterns, you can click on the Manage patterns option under the Options icon at the top-right of the page, or the Manage my patterns link underneath your list of Synced patterns in the Synced patterns tab within the Block Inserter. Once you click this option, you』re presented with a list of all your existing Synced patterns which you can then edit or delete. Before clicking the Manage patterns option, ensure that you save your current Page or Post to avoid losing your recent changes.
如果您想刪除其中一個頁面或文章,請將滑鼠懸停在每一行上時單擊標題下方出現的 「回收站」 連結。這會將頁面/文章移至回收站。
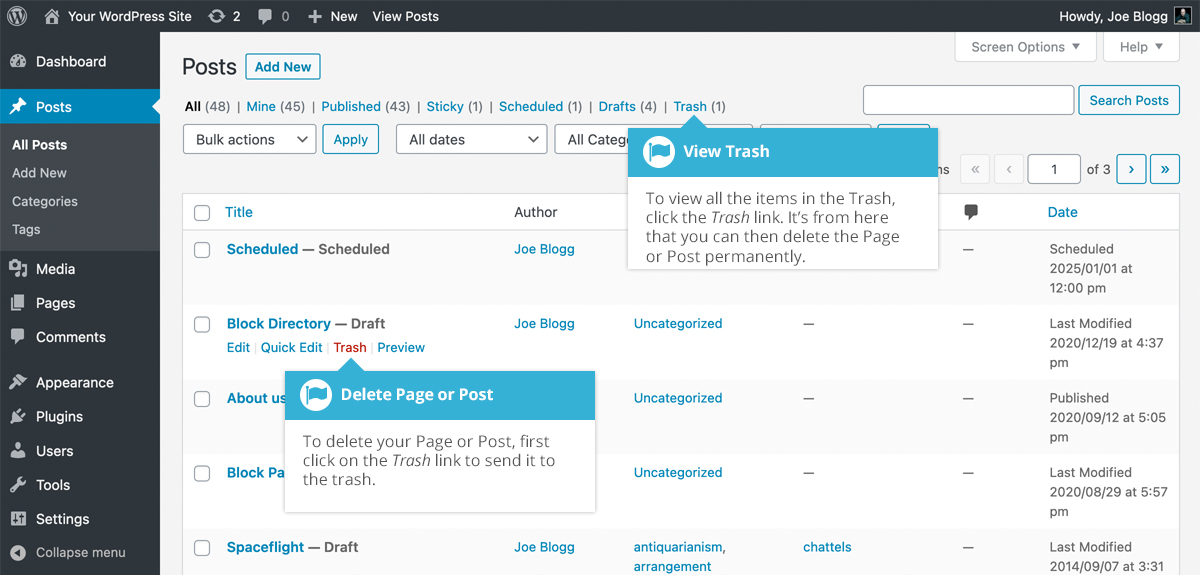
要永久刪除頁面/文章或恢復頁面/文章,請單擊螢幕頂部的「回收站」 連結。當滑鼠懸停在回收站中的每個專案上時,將顯示「恢復」和「永久刪除」連結。單擊永久刪除可永久刪除單個頁面或文章。單擊恢復將恢復頁面或文章。
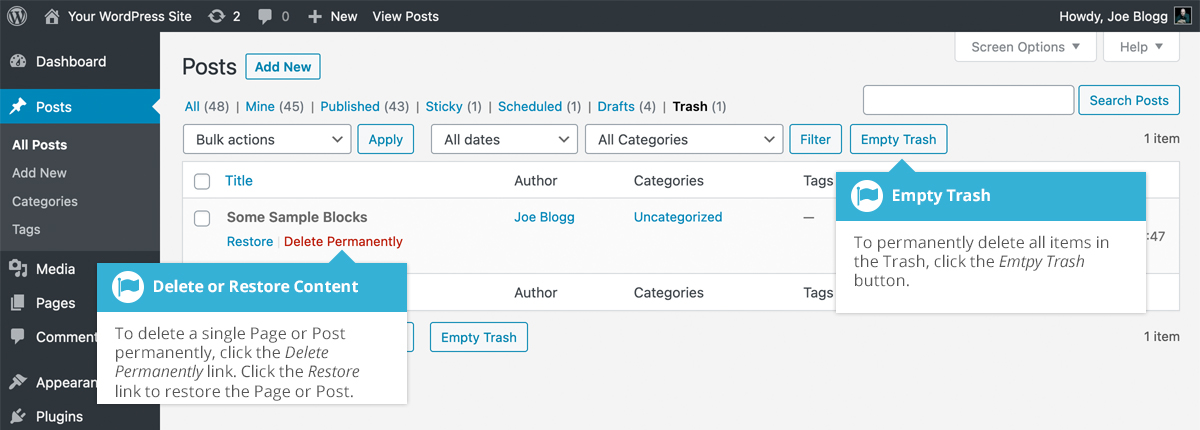
如果您想一次永久刪除或還原多個專案,請單擊要刪除或還原的專案旁邊的覈取方塊,然後從頁面頂部的批次操作下拉選單中選擇還原或永久刪除。選擇適當的操作後,單擊「應用」按鈕進行更改。或者,單擊清空回收站按鈕以刪除回收站中的所有專案。
相簿塊允許您新增圖片庫。插入相簿塊後,單擊塊工具欄上的新增按鈕將影象新增到塊中。單擊「新增」後,您可以使用 「開啟媒體庫」 選項開啟媒體庫,然後從現有影象中進行選擇,或者將新影象拖放到媒體庫中,或者您也可以簡單地選擇 「上傳」選項來瀏覽計算機並選擇要上傳的影象。或者,只需將新影象拖放到相簿塊上,它們就會自動上傳到媒體庫並插入到塊中。
將影象新增到塊後,「設定」 側欄中會提供更多選項。您可以選擇相簿應顯示的列數。您還可以選擇裁剪縮圖,以便它們對齊得更均勻。
使用「連結到」下拉欄位,您可以選擇將每個相簿影象連結到媒體檔案本身,或連結到該檔案的 WordPress 附件頁面。或者,您也可以選擇在相簿影象上不包含任何連結。
當您將每張影象上傳到媒體庫時,您可以為它們新增標題,或者只需在相簿塊中單擊每張影象,然後在提供的欄位中輸入標題即可。您還可以透過在相簿塊最底部的 「編寫相簿標題...」 欄位中輸入一些文字來為整個相簿新增標題。標題的顯示方式取決於您當前使用的主題。
單擊相簿中的每個單獨影象還將為您提供該特定影象的更多選項,例如新增連結、裁剪或應用雙色調濾鏡。您還可以透過單擊選擇單個影象後顯示的工具欄上的「替換」 按鈕來替換單個影象。
相簿塊中的每個影象都是其自己的單獨塊,因此要更改相簿塊的整體佈局,您需要確保選擇外部相簿塊本身,而不是單個影象塊。
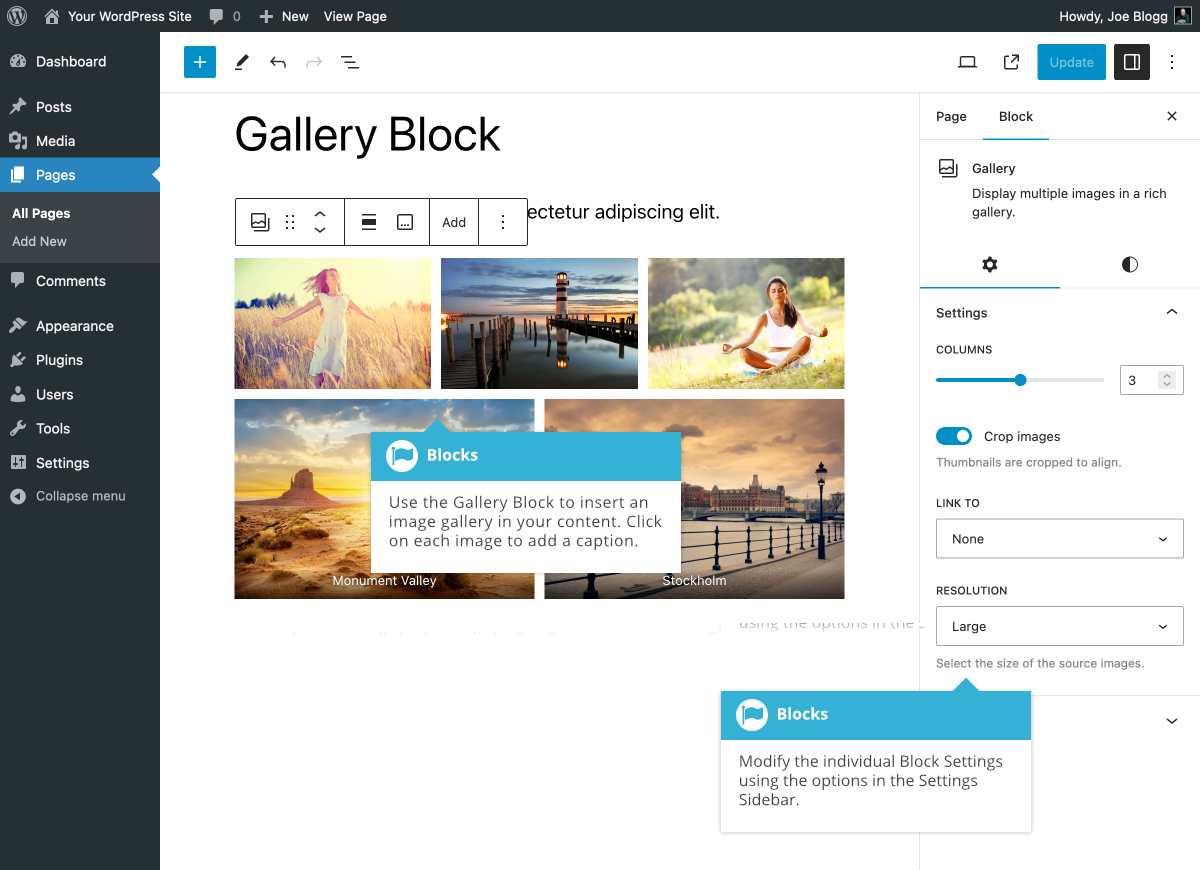
該塊的各種選項位於 「設定」 側欄中單獨的 「設定」( ![]() ) 和 「樣式」(
) 和 「樣式」( ![]() ) 選項卡中。
) 選項卡中。
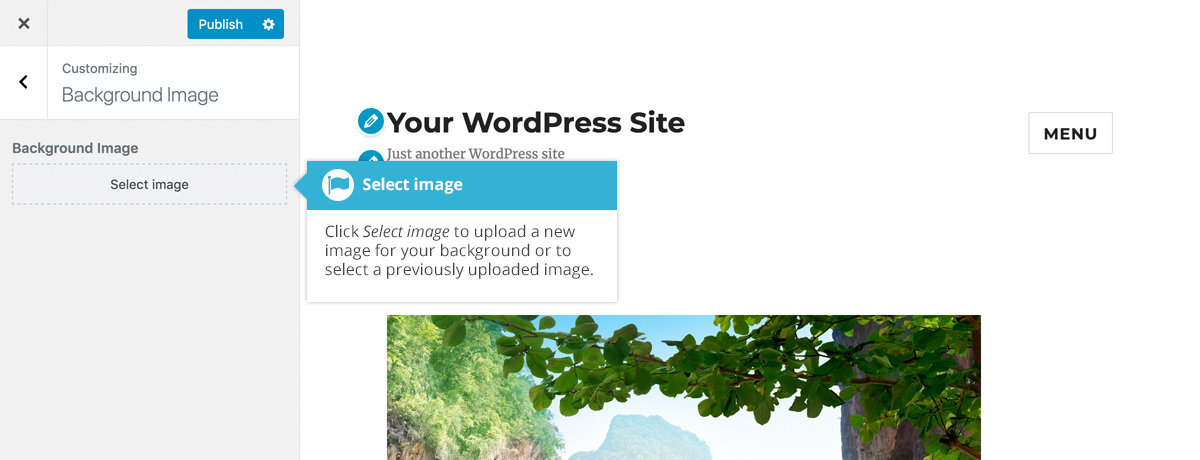
背景選單選項是另一個特定於主題的選單。它允許您為您的網站選擇背景影象。單擊「背景」選單選項將帶您進入定製器中的「背景影象」 面板。您可以選擇之前上傳的影象之一,也可以透過單擊「選擇影象」上傳新影象。要儲存更改,請單擊頁面頂部的「釋出」 按鈕。同樣,根據您當前使用的主題,您可能有也可能沒有此背景選項。